Treadmill Service and Parts
Treadmill Maintenance
Now that you have a treadmill or you have decided to get one, you must know that every JLL treadmill come from the factory perfectly tighten and with a perfect state of lubrication. However, you just need to follow a simple steps to maintain it. Keep the running machine in a clean state would help to prolong its life.
Top 4 things you should do to maintain your treadmill:
- Balance.
- Cleaning.
- Adjust running belt.
- Lubricate.
1. Treadmill Balance:
Try to place the running machine on a level floor for avoiding off-balance. If that is not possible, you should adjust the treadmill by altering the big screws with plastic head located underneath the frames (every treadmill should have those big screws for this task).
1.1. How to check if the treadmill is balanced:
- Stand on the machine with your feet on the frames.
- Put your weight first on the right side and after on the left side.
- If you feel any shakiness, you have to adjust those big screws with plastic head.
2. Treadmill Cleaning:
First of all, you should keep the running belt in optimal condition for the correct working of the treadmill, it has to be free of dust and debris for smooth running and prevent injuries. Dust and dirt on running belt are the enemy of any treadmill board and belt, they could damage the electric motor and other moving parts.
After every workout, body oils, perspiration, hand lotions etc. can reduce the sensibility of the heart rate sensors and interfere with the heart rate signal. Use a neat, dry cloth for cleaning the treadmill and the handrails which will prevent the machine of corrosion. Wipe away any sweat that may have dripped onto the running belt. By using a soft cloth and no paper towel you can avoid scratching the display.
3 easy steps to clean your treadmill running machine:
- Set the speed of the machine around 2 kilometer per hour and put a humid, clean cloth at the end of the running belt, hold it there and move it along the end of that running belt until is free of dust. Only use water to clean and dust. Do not use any cleaning product because they may damage the treadmill.
- Vacuum or sweep the floor underneath and around the treadmill to prevent that any speck goes into the mechanism of the running machine. A treadmill mat can help to avoid dust goes into it.
- Vacuum cleaner or soft, damp cloth to clean treadmill’s entire cover area.
3. Adjust running belt:
After a period of time, the user will feel there is a pause sensation whilst running. This is caused by a loose belt. The method of solving this problem is to tighten an adjustable bolt, which is respective in the left and right end of the treadmill, until you no longer experience this sensation. It does not need to be aligned perfectly, but ensure it is not scraping or rubbing on anything on the sides.
The running belt can loosen and stretch a bit over time causing a slipping sensation if it is not adjusted and tightened when needed. If the belt is too tight, this may cause harm to your motor and/or roller. A belt too loose or too tight can cause wear and tear of both the belt and the board. Here we will show you how to check that and how to adjust tension and alignment of the belt:
3.1. How to check if the running belt is loose:
-
One way of checking is everyday you use the treadmill, stand on the sides of the treadmill (frames) and set the speed of the running machine around 1-2 kilometer per hour.
Walk on the machine and try to stop the running belt with your feet while holding the handrails and pulling your body on the opposite direction.If the belt does not stop, it means that it is tight enough for use.
But, if the running belt stops while you do it means that it has loosened and you have to tighten it. -
Another way is to check if the gap between the running belt and the running board is between 5-6mm. If the gap is smaller than 5mm then this indicates the belt is too loose and needs tightening.
But, if the gap is smaller than that means that the running belt is loosen.
3.2. How to tight the running belt:
- Tighten and line-up your running belt if it has become loose from wear and tear.
- Power off and turn the two belt adjustment screws, located at the rear, clockwise to tighten the belt slightly by quarters.
- Get back to the treadmill and check it again if the belt is loose or not. If it is still loose, re-adjust the belt screws by another quarter. Until you get a tighten belt.
- Run the machine on its own for 1-2 minutes to see if the belt keeps in the middle. If the running belt is still in the center, we can use the treadmill straight away.
- Do the last test. After tightening the belt, you should check if it is in the center. You can leave the machine running for a couple of minutes at high speed, between 6-8 kilometer per hour to check this.
3.3. How can I fix the belt when is not in the center (bear left or right):
You can see a gap between the frames and the running belt which is approximately 5-6 millimeter in both sides. If that gap has different distance means that the belt is eccentric. So we have to put it back in the right position by following these easy steps:
- Power on and set the speed at 2-3 kilometers per hour and and adjust the screw slowly, which is at the end of the treadmill, with an accompanying tool included in the box.
- If the belt slants to the left, please adjust the left bolt in a clockwise sensation or adjust the right bolt in a counter clockwise sensation. If the belt slants to the right, it needs to be adjusted in the opposite manner.
- At the same time you screw, you must check if the gap of difference has disappeared, if it is still there, screw again. Repeat this procedure until you get the running belt in the center.
- Set the speed on 6 kilometer per hour to check if the running belt is still in the same position. Once you checked that, the treadmill is ready for being used.
4. Treadmill Lubrication:
The running belt must be lubricated by a special lubrication oil after a period of usage. Consult your instructional manual for specific information about type of lubricant you must use, how often you should lubricate the running belt and where to apply it.
If the level of friction between the deck and the belt is high, it will damage the motor and electronics. Continual lubrication of the running board will greatly increase the life of the running board, walking belt and the motor. A treadmill well-lubricated will have a smooth running and last longer, and that is what we want!
5 steps to keep a well-lubricated treadmill:
- Unplug the treadmill.
-
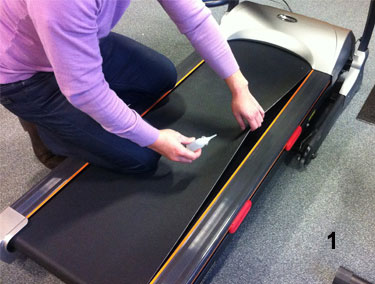
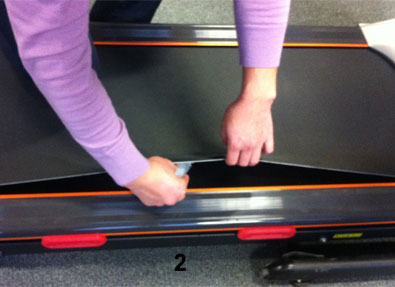
You will need to access the deck and this can be achieved by lifting the belt on the treadmill up with something flat and no sharp.
-
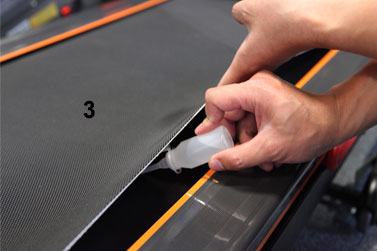
Look at the running board or touch it to check if it is oily or not. In case it does not appear oily enough, use the lubrication oil provided with every treadmill machine, place it underneath the running belt and spread a straight line of treadmill lubricant down the side of the deck
-
Repeat on the other side.
- Turn on the machine and leave it running for around 2-3 minutes at 3-4 kilometer per hour walk on the treadmill to help spread the lubrication oil.
- If you use the treadmill less than 3 hours per week, you should lubricate it every 6 months.
- If the usage is 3-6 hours per week, the lubrication should be every 3 months.
- And for more than 6 hours per week, lubricate it every month.
Treadmill's Parts:
When you need to replace your lubricant oil, you can be purchase this easily via our website on the Accessories page.
In the event of losing your key, you can purchase an Allen key from most tool retailers.
If you need to replace your emergency key, these can be purchased from our Accessories page. Our emergency keys are compatible with most treadmill models.
In the event you have any issues with your treadmill while it is under warranty, we will send a technician to your home/gym to fix the issue with all parts and labour included!